Inserting a full-width image (landscape or square)
- Drag image into the ‘Drop files here’ space (or select an image already uploaded to the Media Library)
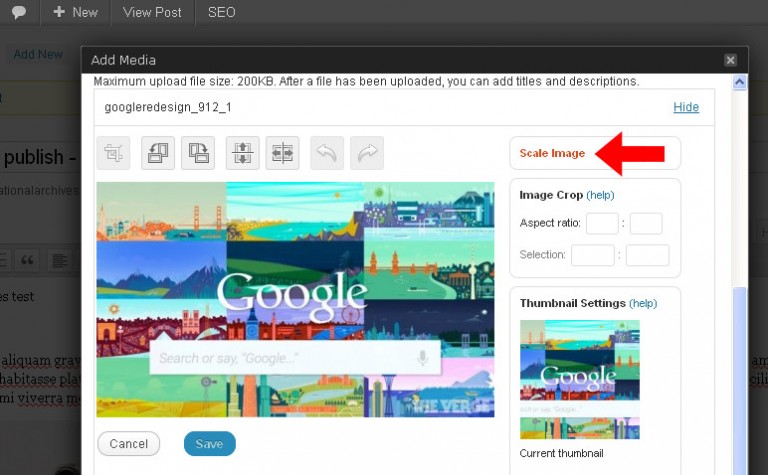
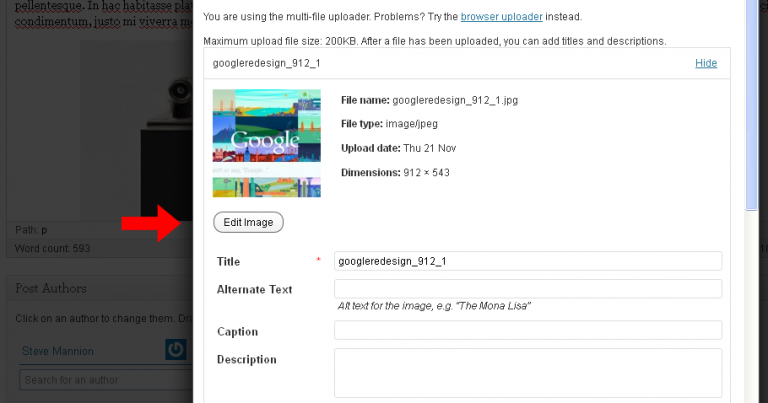
- Click ‘Edit Image’ button underneath square thumbnail of the added image
- Click ‘Scale Image’ link on the right hand side
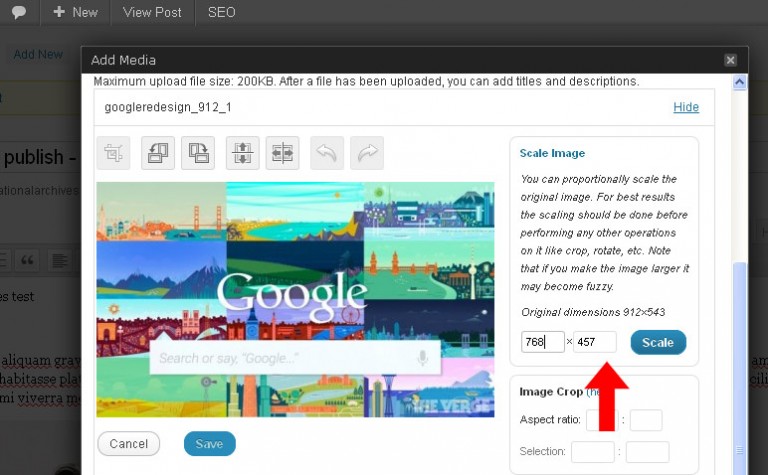
- Change the width to 768 – the height figure will automatically adjust. Click ‘Scale’ button.
- Enter Title, Alternate Text, caption (if required)
- Image links:
- If the image needs to be a link to the full size version of the image to open in a lightbox then click the ‘File URL’ button under the Link URL options.
- If the image needs to link to a webpage please enter the URL in the Link URL field.
- If the image does not need to be a link please click the ‘None’ button.
- Tick the ‘Center’ option under Alignment
- Tick the ‘Full Size’ option under Size
- Click ‘Insert into Post’
Inserting a half-width image (profile or square)
- Follow the steps as above except for:
- Scale Image: Change the width to 384 – the height figure will automatically adjust. Click ‘Scale’ button.
- Alignment: Instead of ‘Center’ select the ‘Right’ or ‘Left’ option. It is recommended that the first image in a post should be aligned to the right and any further images should alternate between left and right.
- Size: Tick the ‘Half-width’ option
Selecting and editing featured images (thumbnail images for blogposts)
- On the post creation page scroll down to the Featured Image box on the right-hand side and click ‘Set featured image’.
- If the image you want to use for the thumbnail has not already been uploaded do this now, otherwise click the ‘Gallery’ tab and click the ‘Show’ option in the row of the listed image you wish to use.
- If the image is significantly larger than 180 pixels in height you may need to crop and/or resize it so that it is clear what the image is of at the size it will appear on the Blog homepage and other pages on the site where this thumbnail might be used. Click the ‘Edit Image’ button if this is the case.
- If the width of the image looks roughly double the height then in most cases you need only scale the image down without cropping it. Click ‘Scale Image’ and set either the width to 400 or the height to 180 (choose the latter if not doing so results in the height being less than 180). Click ‘Scale’. If an error is made you can click the ‘Restore Original Image’ link (followed by the ‘Restore Image’ button) and then redo these actions until the image has been.
- An image may need cropping because only a certain part of it is worth focussing on for thumbnail purposes e.g. just an area of the foreground or the centre or just the area featuring a specific object or person or a person’s face. To crop, click on the main image displayed in the ‘Set featured image’ window, hold the left mouse button down and drag up, down, left or right to create a rectangular area within the image.
- Release selection when you are happy with the proportions of the area you have defined. Alternatively you can type an exact width or height in the Selection fields in the Image Crop box to the right of the image. If you set the width to 400 and the height to 180 you would then not need to scale the image further. For larger images you can set the height and width to e.g. 800×360 and then scale the image down by half (not doing so would mean the thumbnail shows only 50% of the cropped image from its centre).
- To execute the crop, click the Crop button which is the first of the seven buttons above the main image. You will see the main image changes and is now the cropped version you just created. Click Cancel to undo this and try again, otherwise click Save.
- You may then follow step 4 to scale the image down if you would like all of the cropped image to appear in the thumbnail. Otherwise scroll down (you can ignore the Thumbnail Settings as these do not apply to the featured images we create) and add an appropriate Title and Alternate Text.
- The featured image will automatically link to the blogpost it represents the Alignment and Size options are not applicable so all that is left to do is select the ‘Use as featured image’ link next to the ‘Insert into Post’ button (do not click the latter). This will automatically update. Click ‘Save all changes’ to save any Title and Alternate Text you added and then click outside the ‘Set featured image’ box to remove it.
- In order to see how the featured image looks you will need to click ‘Update’ and then return to the Blog homepage so try and ensure that the featured image is created after all other edits to the blog post itself have been carried out and checked. You can make changes to the featured image at any time (including replacing it entirely) by repeating any of the steps above. To edit a featured image simply click on the preview of the image in the ‘Featured Image’ box.